Installation
Installing Termbook is a very quick and easy process. We know these docs may appear long but that's just so you have all the info you need!
Before you start, ensure Termbook is supported on your system.
Termbook supports the following architectures:
- Windows x32 and x64
- Linux x32 and x64
- MacOS Intel and Apple Silicon
Once you've confirmed your system is supported, follow the quick and easy instructions below to get up and running with your personal journal in just a couple minutes.
Download
- Navigate to the download page here
- On the download page, select the proper version for your system.
- Download the binary executable.
Next Steps
Once you've downloaded the executable navigate to where it was downloaded.
Once you've found where your Termbook was downloaded follow the below depending on your OS:
Windows:
- Open File Explorer and locate your Termbook executable.
- On the file, click:
Shift + Right-click
- This wil bring up an extended context menu.
- In the context menu, click:
Copy as path
- This will copy the full path of the file, including the filename to your clipboard.
MacOS:
- Right click the file
- Press and hold the 'option' key on the bottom left of your keyboard.
- Click:
Copy "Termbook-YourSystem" as Pathname
- This will copy the full path for the file to your clipboard.
- In your terminal window, type:
chmod u+x /path/to/Termbook-YourSystem
- Make sure to replace the path with the actual path where you have downloaded and made 'Termbook-YourSystem' executable
Linux:
On linux it will vary by distribution, please refer to the documentation if you prefer to copy the path in the same manner as Windows and MacOS.
Copying it via terminal is much more straightforward:
- Open your terminal
- Use the 'cd' command to navigate to the directory where the Termbook executable is located
- Once you're in the correct directory, use the 'pwd' command to print the current working directory. This will display the full path of the directory in your terminal. You should see something like this:
/home/user/downloads/
- Right-click copy the full path and right-click paste it back into your terminal, then append the name of your executable to the end of it. You should have something that looks similar to this:
/home/user/downloads/Termbook-LinuxVersion
- Highlight this path, right-click, and copy it.
- Now in your terminal window, type:
chmod u+x
- Now paste your path to Termbook-LinuxVersion to the end, it should look something like:
chmod u+x /home/user/downloads/Termbook-LinuxVersion
- Make sure to fill in the path with your actual path where your 'Termbook' executable is located.
Modifying your Terminal setup file
You may be familiar with the concept of a Terminal setup file already but if you're not you've probably seen the name of one somewhere. They have a file extension that looks like this:
.zshrc, .bashrc, .bash_profile, profile.ps1, etc
Don't worry if you've never seen one, we'll make everything super easy to follow.
Here's all you have to do:
- Open your Terminal setup file
- Find an open line and write
/
- Now you're going to right-click and paste that path of your Termbook executable you copied before. You should have something like this:
/path/to/your/Termbook-YourSystem
Here's an example of what your file may look like;
# Some general settings that already exist
PS1='[\u@\h \W]\$ '
alias ll='ls -l'

# Adding your termbook
# Replace '/path/to/termbook' with
# the actual path of your Termbook executable
/path/to/your/termbook_yoursystemhere
export PATH
Save and close this file.
You can now close your terminal and reopen it.
Adjust System Permissions
Great work! You're almost ready to start journaling in your Termbook! Just a couple more quick steps to make it all work.
For Linux users:
No additional steps are needed, Linux users you can get to journaling, congrats!
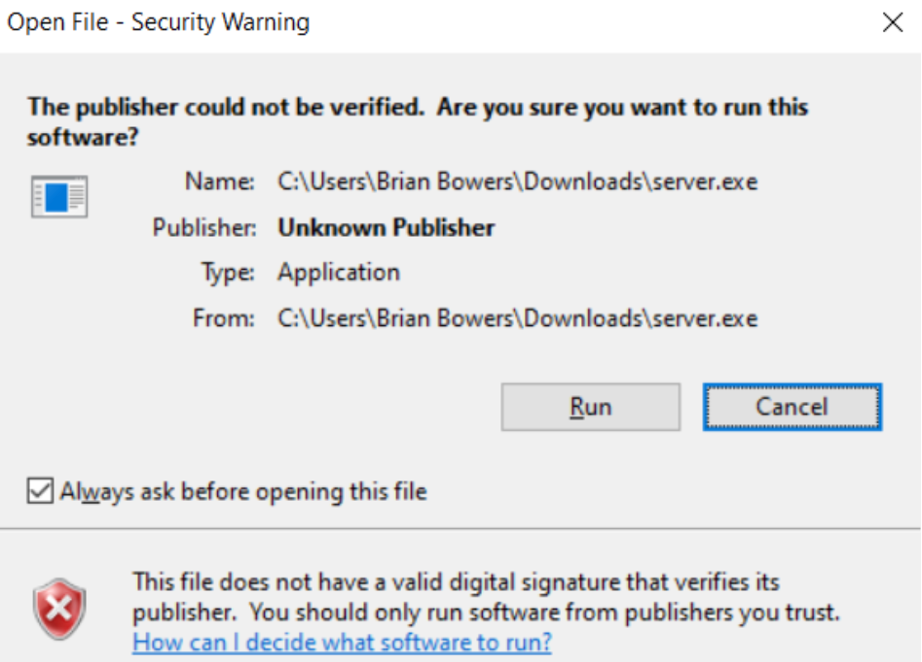
For Windows users:
Run the executable, a pop up will appear stating "The publisher could not be verified. Are you sure you want to run this software?", to this click "Run". You'll also want to uncheck the box that says "Always ask before opening this file".
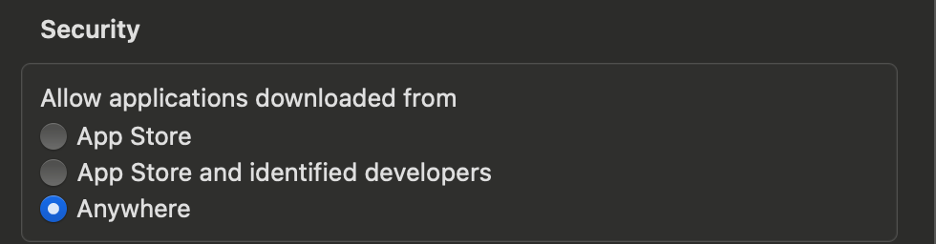
For MacOS users:
Open a terminal session and run:
sudo spctl --master-disable
When prompted enter your password. If you do not enter your password Termbook will not work!
Now open and go to
system settings -> security settings
Select the option:
allow apps from anywhere
Congrats, you're all set! You can now get to journaling in your new Termbook!
To view your journal entries, login to Termbook.co and open your profile!